I experimented with peel-and-stick wallpaper, repainted pieces of furniture, and used my favorite Annie Sloan chalk paint techniques to give older items new life. Those projects served their purpose at the time — they were affordable, creative solutions that allowed me to personalize our home without spending a fortune. If you’ve ever worked with chalk paint, you know how transformative it can be for older furniture pieces, which is why it’s become such a popular DIY method for refinishing projects (you can see examples and tutorials directly from the brand at Annie Sloan Chalk Paint).
My $500 Budget Dining Room Makeover: A DIY Floating Buffet Without IKEA Cabinets
I am officially obsessed! This might be my favorite project to date. One of my biggest goals for 2026 was to stop playing it safe and finally dive into custom home builds. For a long time, I let fear tell me I wasn’t ‘handy’ enough—but this is the year I’m stretching myself and going big! I decided the perfect ‘entry-level’ custom build was an IKEA hack. By using pre-made cabinets as a base, I could focus on the creative details without the DIY burnout. I grabbed three Oak Brook wall cabinets and transformed them into a sleek, custom DIY Floating Buffet for the dining room. Consider the bar officially raised!
Thinking about a budget dining room makeover can be both exciting and daunting. The key is knowing where to start.

The Dining Room: Why Now?
Why the Dining Room Needed a Refresh
When we moved into our home eleven years ago, the dining room was one of those spaces that simply worked. It had a table, chairs, a few decorative touches, and enough personality to feel warm and lived in. Over time, like many family homes, it slowly evolved through a mix of hand-me-down furniture, Facebook Marketplace finds, and small DIY updates.
Embracing a budget dining room makeover means being resourceful and creative with existing materials.

But after more than a decade, the space started to feel heavy and outdated compared to the rest of the house.
Because the dining room sits right at the front of our open-concept home, it’s the first thing people see when they walk through the door. And since I work from home full time, it’s also a space I pass through dozens of times a day. Eventually I realized that while the room was functional, it didn’t reflect the calmer, brighter aesthetic I had started to gravitate toward.
I’ve always believed our homes quietly mirror our emotional landscape. When life feels chaotic, we start organizing. When we want peace, we gravitate toward neutral tones and cleaner spaces. Interior designers often talk about how our environment influences mood and productivity, and research from environmental psychology supports the idea that clutter and visual noise can increase stress levels in daily life (see research summarized by American Psychological Association on how physical environments affect mental well-being).
That realization pushed me toward a budget dining room makeover. Not a full demolition or an expensive renovation, but a thoughtful reset.

Instead of throwing everything out and starting from scratch, I approached the project the same way I approach most DIY renovations: I looked at the room like a canvas. What could stay? What could be refinished? What could be redesigned within a realistic budget?
One thing I knew immediately was that I wanted the room to feel more modern and intentional. Clean lines. Brighter surfaces. Less visual clutter.
That’s when I came across a floating buffet concept from Taryn Whiteaker that completely changed how I thought about the space. Her design used IKEA cabinets

to create a sleek built-in look that felt both minimal and functional — exactly the style I wanted for this budget dining room makeover.
There was just one problem.
The IKEA cabinets she used were completely out of stock anywhere near me.
So instead of abandoning the idea, I did what most DIY projects eventually require: I started researching alternatives.
In the next section, I’ll walk through how I adapted the original concept and created my own DIY floating buffet using Lowe’s cabinets, all while staying under my $500 budget.
Ultimately, the essence of a budget dining room makeover lies in thoughtful planning and execution.
The Inspiration: A Floating Buffet That Changed the Plan
Why Floating Cabinets
Floating cabinetry is commonly used in modern interiors to create a lighter, more open feel, a concept often highlighted by publications like Architectural Digest.
Every DIY project usually starts the same way — a late-night rabbit hole of design inspiration.
While researching ideas for a budget dining room makeover , I came across a floating buffet design created by Taryn Whiteaker. Her project used wall-mounted IKEA cabinets to create a clean, modern built-in that looked far more expensive than it actually was.
What immediately stood out to me was how simple and intentional the design felt.
Instead of a traditional bulky sideboard sitting on the floor, the cabinets were mounted to the wall so they appeared to “float.” The effect instantly made the room feel more open and modern while still adding practical storage.
Floating furniture is a design technique used frequently in contemporary interiors because it visually lightens a space and reduces visual clutter. Designers often recommend floating vanities, media consoles, or buffets in open-concept homes because they create cleaner sightlines and make a room feel larger (you can see similar modern floating furniture concepts used by designers featured by Architectural Digest).
The more I looked at the design, the more I realized it solved several problems in our dining room at once.
It would add storage for serving dishes and table decor.
It would anchor the wall without making the room feel crowded. And most importantly, it would give the space a modern focal point.
In other words, it was exactly the kind of upgrade I was hoping to achieve with this budget dining room makeover.
There was just one complication.
The original project relied on IKEA cabinets that simply weren’t available near me. I checked inventory within a 300-mile radius and came up empty.
At that point, I had two options.
Wait months for cabinets to come back in stock, or figure out how to recreate the look using materials I could actually find.
DIY projects tend to reward a little stubborn creativity, so I decided to adapt the idea instead of abandoning it.
That meant heading to the one place every DIY project eventually leads: the hardware store.
Each idea I explored for a budget dining room makeover was aimed at enhancing functionality while keeping costs low.
Finding the Cabinets (When IKEA Was Out of Stock)
Once I had my design direction, I did what every DIYer does — I went straight to IKEA.com.
And immediately hit a wall for my budget dining room makeover.
The cabinets used in the original floating buffet design were completely out of stock. Not just locally… but within a 300-mile radius. I checked multiple stores, refreshed inventory more times than I’d like to admit, and even considered driving a few hours if I could find them.
Nothing.
At that point, I had two options:
wait indefinitely… or figure out a way to recreate the look with what I could get.
So I pivoted. Right to Lowes!
Finding unique solutions for a budget dining room makeover often involves exploring various stores and options.
Transform your dining room on a budget and discover exciting alternatives to IKEA!
Whenever I think about my budget dining room makeover, I remember the importance of flexibility in design choices.
💡 DIY Tip: Don’t Wait for Perfect Materials
One thing I’ve learned with DIY projects is that waiting for the exact materials can stall your progress for months. Instead, focus on finding pieces that have the right structure and dimensions, then customize the finish to match your vision.
That’s exactly how this budget dining room makeover came together — not by finding the perfect cabinets, but by making the available ones work.
I headed to Lowe’s and started walking the cabinet aisles with one goal in mind:
Find something that could mimic a built-in, floating look — without the custom price tag.
Here’s what I focused on:
- Flat-front or simple panel doors
Clean lines were key to keeping the modern aesthetic - Consistent cabinet depth
I needed everything to sit flush across the wall - Affordable pricing
The entire project needed to stay within my $500 budget dining room makeover - Stock availability
No waiting months for materials — I wanted to get started
After comparing a few options, I landed on a set of stock cabinets that checked all the boxes. They weren’t perfect out of the box, but they had the right structure to build on.
And honestly, that’s where most good DIY projects start — not perfect materials, just workable ones.
✔️ What to Look for in Budget Cabinets
If you’re planning your own DIY floating buffet, here’s what to prioritize:
In planning a budget dining room makeover, it’s essential to visualize how pieces will work together.
- Simple or shaker-style cabinet doors
- Consistent cabinet depth (for a seamless look)
- Solid construction (avoid flimsy particle board if possible)
- In-stock availability (trust me on this one)
- Price point that leaves room in your overall budget
Making Stock Cabinets Look Custom
The goal wasn’t just to install cabinets.
The goal was to make them look like they were designed specifically for this space.
That meant thinking beyond the product itself and focusing on:
- How they would line up across the wall
- How the spacing would look visually
- How the countertop would tie everything together
- And how the finish (paint/stain) would elevate the final look
This is where a budget dining room makeover really comes to life — not by buying high-end materials, but by making smart design decisions that create a high-end result.
Measuring and Planning the Layout
Before buying anything, I measured everything.
And then measured it again.
Here’s what I mapped out:
- Total wall width
- Desired buffet length
- Cabinet widths and spacing
- Height placement for the “floating” effect
- Outlet locations (don’t skip this — learned the hard way)
- Stud placement for secure mounting
I even sketched the layout to visualize how the cabinets would sit together. The goal was symmetry — something that looked intentional, not pieced together.
Because once everything is installed, small misalignments become very noticeable.
⚠️ Reality Check
Stock cabinets are not going to look custom straight out of the box.
There will be gaps. Slight inconsistencies. Things you have to adjust.
But that’s where the transformation happens.
With the right layout, finish, and a little patience, you can take something basic and make it look completely intentional.
Staying on Budget
One of my biggest priorities was keeping this entire project under $500.
That meant making trade-offs:
- Reusing decor where I could
- Refinishing instead of replacing (like my dining table)
- Choosing stock cabinets over custom
- Prioritizing visual impact over perfection
And honestly, that constraint ended up being the best part of the project.
Because instead of relying on expensive materials, I had to rely on creativity.
Staying within budget while achieving my vision for the budget dining room makeover was crucial to the success of the project.
The Final Plan
After considering various options, I settled on a design that perfectly aligned with my budget dining room makeover goals.
By the time I left the store, I had:
- A cabinet layout mapped out
- Materials selected
- A clear installation plan
- And a budget I could actually stick to
No IKEA cabinets.
No custom millwork.
No oversized renovation budget.
Just a plan to create a DIY floating buffet using Lowe’s cabinets — and make it look like it belonged in the space all along.
In this budget dining room makeover, I aimed for a clean and functional design that maximizes both style and utility.
The Design Plan: Layout, Finishes & Bringing It All Together
Once I had the cabinets figured out, the next step was making sure everything actually worked together — not just functionally, but visually.
Because here’s the truth about a budget dining room makeover:
You don’t get the luxury of expensive materials doing the heavy lifting.
The design has to do that.
Creating a Layout That Felt Intentional
Planning the layout for my budget dining room makeover involved understanding the flow of the space.
Before installing anything, I mapped out the entire wall.
I wasn’t just placing cabinets — I was trying to create something that looked like it had always been part of the home.
Here’s what I focused on:
- Centering the buffet under the main artwork
- Keeping equal spacing on both sides for balance
- Aligning everything with the wall molding
- Choosing a height that would give that “floating” effect without feeling awkward
That last one took some thought.
Too low, and it looks like standard base cabinets.
Too high, and it starts to feel disconnected from the room.
I wanted that in-between — where it feels light, clean, and intentional.
Working With What I Already Had
One of the biggest decisions I made was to keep my dining table. We originally found it on Facebook Marketplace, and it’s actually a solid West Elm piece — great structure, just… not my best finishing job the first time around. I had originally refinished it when I was learning the Pottery Barn driftwood technique, and let’s just say — it didn’t quite hit the mark.
So instead of replacing it (which would have completely blown the budget), I decided to redo it. And honestly, that decision shaped the entire room. Because once I committed to refinishing the table, everything else needed to complement that finish — not compete with it.
The choices I made for my budget dining room makeover reflect my personal style while adhering to the budget.
The Driftwood Finish (Take Two)
This time around, I approached the finish differently.
Instead of rushing through it, I focused on building layers and letting the wood texture show through.
The goal was to create that soft, weathered look you see in high-end furniture — something inspired by pieces from places like Pottery Barn, but a little warmer and more livable.
Refining my finishes was a key step in ensuring the success of my budget dining room makeover.
What I was aiming for:
- Soft gray-beige tones (not too cool, not too warm)
- Visible wood grain for texture
- A matte, natural finish
- Slight variation so it didn’t look flat or painted
And this time… it worked.
Not perfectly — but in a way that felt real and lived-in, not showroom staged.
Choosing Finishes That Elevated the Space
With the cabinets and table both leaning into that driftwood tone, I needed to balance the space so everything didn’t blend together.
Here’s what tied it all together:
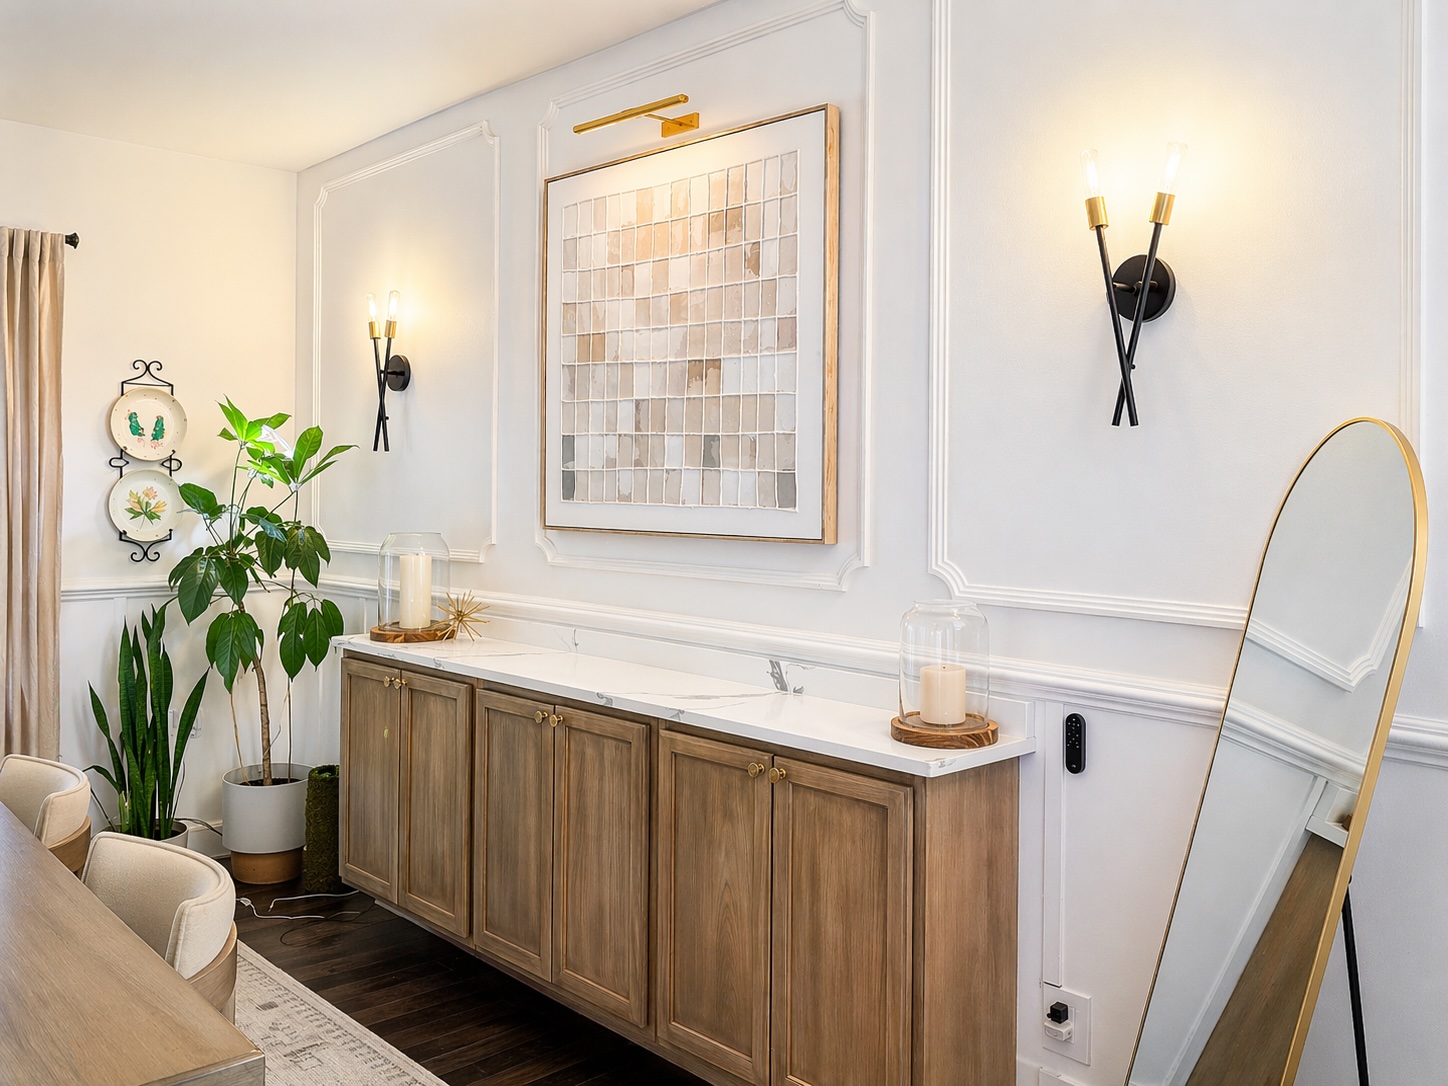
- Countertop: A light, marble-look surface to brighten the entire wall
- Hardware: Warm brass knobs for contrast and a slightly elevated feel
- Lighting: Modern sconces to frame the space and add warmth
- Decor: Minimal, neutral styling to keep the focus on the structure
It’s a simple formula, but it works:
Warm wood + light surface + contrast accents = a balanced, modern look
Designing for the Whole Room (Not Just the Buffet)
One thing I kept coming back to during this project was that the buffet wasn’t the goal — the room was. Because in an open-concept home, everything connects.
The wall molding, the artwork, the lighting, the furniture — it all has to feel cohesive.
That meant constantly stepping back and asking:
- Does this feel too heavy?
- Does it need contrast?
- Is there enough light in the space?
- Does this still feel like home?
Those small decisions are what turn a project from “DIY” into something that feels designed.
Why This Step Matters in a Budget Dining Room Makeover
When you’re working with a limited budget, your finish choices matter more than anything else.
You can take:
- Basic cabinets
- A secondhand table
- Affordable materials
And turn them into something that feels high-end — if the finishes are intentional.
That’s really what this phase was about.
Not just building something that works…
but creating something that feels like it belongs.
Installing the Floating Buffet (Step-by-Step)
Once the planning and design decisions were done, it was time to actually bring the DIY floating buffet to life.
And I’ll be honest — this part looks simple in photos, but it requires precision.
Because once those cabinets are on the wall… there’s no hiding mistakes.
Before anything else, I used a stud finder to locate the wall studs.
This is non-negotiable.
Floating cabinets carry weight, and securing them directly into studs ensures they stay level and safe over time. If you’re new to this step, there are great beginner-friendly guides from Lowe’s that walk through how to properly locate and mark studs.
Next, I used a level to draw a straight horizontal line across the wall where the cabinets would sit. Grab your blue painters tape and place it below the line.
This line becomes your guide for installation.
Even if your floors aren’t perfectly level (most aren’t), your cabinets need to be — otherwise everything will look off once installed.
I used the French cleat method to install my cabinets. Here is a good explanation that also shows you how to install them.
Working one cabinet at a time:
- I lifted each cabinet into place
- Aligned it with the level line
- Secured it into the studs
This part is definitely easier with a second set of hands.
Keeping everything aligned while drilling is not something you want to fight alone if you don’t have to.
You need to use heavy duty screws and ensure you drill into the stud. Pro Tip: Pre-drill your holes using a drill bit that is smaller than your wood screws.
Once all cabinets were mounted:
- I secured them to each other
- Checked spacing between units
- Adjusted alignment where needed
To secure cabinets together – clamp the face frames flush, pre-drill pilot holes, and fasten them using 2-1/2 inch cabinet screws, typically at the top, middle, and bottom. Remove doors for easier access, and ensure cabinets are level and shimmed before final fastening, ideally working from a corner outwards.

This is where the “custom built-in” look really starts to come together.
Small adjustments here make a big difference in the final result.
⚠️ Reality Check
This wasn’t a perfectly smooth process.
There were small gaps. Slight adjustments. A few moments where things didn’t line up exactly how I expected.
But that’s normal.
DIY projects rarely come together perfectly on the first try — and learning how to adjust along the way is part of the process.
Once the cabinets were secure, I added the countertop.
This step instantly changed the look of the entire project.
The lighter surface:
- Brightened the space
- Added contrast against the cabinets
- Made the buffet feel more finished and intentional
Pro Tips: Check out granite or stone distributors before purchasing at the hardware store like Home Depot or Lowes – I was able to get a “scrap piece” that was left over from another job that I got for dirt cheap. I only paid for labor and delivery. This is key for keeping your project under budget.
To finish everything off, I:
- Installed hardware
- Cleaned up edges and seams (caulk is your best friend in DIY)
- Styled the top of the buffet
And just like that, the structure was complete.
Styling the Floating Buffet
-
Keeping It Light and Intentional
-
Creating Height and Balance
-
Mixing Textures for Depth
-
Letting the Buffet Be the Focal Point
Keeping It Light and Intentional
– For this budget dining room makeover, my goal wasn’t to fill every inch of space.
It was the opposite.
I wanted the room to feel:
- lighter
- calmer
- more open
So instead of layering in a lot of decor, I focused on a few pieces that would complement the buffet without competing with it.
Creating Height and Balance
One of the easiest ways to make a styled surface feel more intentional is by varying height.
Instead of placing everything at the same level, I created a simple visual flow:
- A large leaning mirror to anchor the space and reflect light
- Taller decor elements on one side for height
- Smaller grouped items on the other side for balance
- Open space in between to keep it from feeling cluttered
That variation keeps your eye moving and gives the entire setup a more designer feel.
Mixing Textures for Depth
Because the cabinets and table both have a driftwood-inspired finish, I didn’t want everything to blend together.
So I brought in contrast through texture:
- Ceramic pieces for softness
- Greenery for life and color
- Candles for warmth
- A mix of smooth and natural materials
This combination helps break up the tones and adds dimension without overwhelming the space.
Letting the Buffet Be the Focal Point
It’s easy to over-style a space — especially after putting in so much work to build it.
But one of the biggest lessons I’ve learned is this:
Not every surface needs to be filled.
The floating buffet already adds structure, texture, and visual interest.
So instead of layering on more, I let it stand on its own and used decor to enhance it — not hide it.
Cost Breakdown: How I Stayed Under $500
One of my biggest goals with this project was staying within a realistic budget.
Here’s how everything added up:
-
Cabinets from Lowes $350
Project Source Oak Brook 30-in W x 30-in H x 12-in D Natural Unfinished Oak Wall Fully Assembled Cabinet Flat Panel Square
-
Countertop $100
remember - the key is to find a scrap and use your best negotiation to talk them down!
-
Harware $21
Brass Cabinet Knobs Pulls Cabinet Drawer Dresser Gold Knobs
-
Paint / stain supplies $0
1. Paint Wash (Used left over bar Harbour Beige) and water mixed 2. Java Glaze (check out my Pottery Barn Faux Driftwood
-
Misc materials (anchors, screws, etc.) $0
-
Grand Total $471
Where I Saved Money
- Kept and refinished my existing dining table
- Used stock cabinets instead of custom
- Reused decor I already owned
- Focused spending on high-impact areas
Note: I had the sconces that I bought years earlier and never got to install them. My friend was nice enough to ensure I installed them correctly.
Additionally, I did replace the chairs but did not include that in my budget. I got these off facebook marketplace BRAND NEW. They are Christopher Knight from Target.
Before & After
The difference isn’t just visual.
The room feels:
- Brighter
- Lighter
- More intentional
- More reflective of where we are now

What I’d Do Differently
No project is perfect, and this one is no exception.
If I were to do this again, I would:
- Spend a little more time on cabinet alignment upfront
- Plan for outlet placement earlier
- Test finish samples more extensively before committing
- Have a second set of hands from the start
But Overall?
I’d do it again.
Because this project wasn’t just about updating a room.
It was about creating a space that finally felt like it fit this season of life.
A Budget Dining Room Makeover That Feels Like Home
This budget dining room makeover wasn’t about starting over.
It was about reworking what I already had and turning it into something that felt fresh, intentional, and more aligned with how I want my home to feel.
You don’t need a massive budget to create a space you love.
You just need:
- A clear vision
- A willingness to adapt
- And a little patience along the way
And sometimes, the best transformations come from working within limits — not around them.
If you’re thinking about tackling your own DIY floating buffet or dining room update, I’d love to hear what you’re planning — drop it in the comments or save this post for later!